- Home - Blue Palmetto Home Inspection of Summerville and Charleston
- Learn About Us and This Charleston Home Inspector
- What's Inspected
- Charleston Lowcountry Inspection Areas (geographic)
- Testimonials
- >>>Blogs (educational)
- Sample Reports & Documents
- Why Get a Home Inspection Report
- Charleston's Top Ten Reasons
- Home Inspector Photo Galleries
- Pricing
- Scheduling and Customer Information
- Home Inspection Authorization Contract
- General Scope of Work (electronic)
- Home Inspection Customer Satisfaction Survey
- Privacy Policy
- Full site
- The Roof Framers Field Manual
How to change a fuel filter in a 2004 kia rio
Submitted by Ray Thornburg on Thu, 01/23/2014 - 11:48
How to Change a Fuel Filter in a 2004 Kia Rio
Don't be surprised if you have a hard time finding the fuel filter on a 2004 kia rio. I looked everywhere to find a filter which looked like the one the auto parts store gave me. In the end I had to go to the dealership where they explained that the fuel filter is in the gas tank wrapped around the fuel pump. (Not the typical location) The dealership typically changes the pump and filter out as a unit but you can save cash by just ordering the filter. Mine was around 41 bucks.
The Symptoms
Fuel filters typically need to be changed every so often. My car would start sometimes and other times (on cool damp days) it wouldn't start at all. When a fuel filter gets clogged the engine may stumble and run rough. You may have to pump the gas to get it going. I knew it wasn't the fuel pump because I could hear the fuel pump energize for a few seconds when I turned the key on. Be aware though that fouled or incorrectly gapped spark plugs may exhibit some of the same symptoms. (If your car only runs rough on cool rainy or foggy days it could be the coil. The moisture in the air is affecting it. To test it mist a little water on it (with a water bottle) while it is running to see if it chokes out. If it does look no farther.)
Location
The fuel filter on this car is in the gas tank wrapped around the fuel pump. Fortunately it is actually easy to get to. Take out the back seat by unscrewing the two bolts in front of the seat which hold it in. Below it is a cover with four screws where the fuel pump is located.
The Procedure
I know this procedure works on the 2004 kia reo but the location of the fuel filter on a kia of other model years may be different.
 This picture shows the fuel pump access cover. First remove the fuel pump fuse and crank the engine. Run it until it runs out of gas to relieve the fuel pressure. You must disconnect the gas line and the electrical connectors. Click the images to enlarge into a new window.
 After you remove the rubber ring hiding the retaining ring; unscrew it by putting a screwdriver into one of the little holes and gently tapping to loosen it. It has threads like a jar.

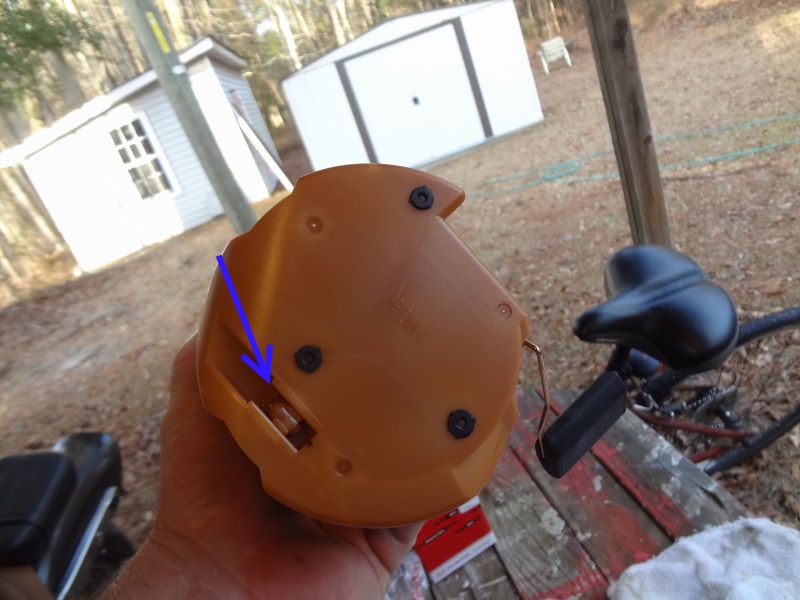
The retaining ring (blue arrow) and the rubber ring which covers it (red arrow). Now the pump is ready to remove.
 Lay the pump on a clean towel to work on it. Note the float (blue arrow) and the plastic clips (red arrow). You must be careful not to break the plastic tabs.

This is what the new filter looks like. It goes inside the pump casing.
 Another view of the new filter. Note the plastic tabs (red arrows). The blue arrows show that the pump motor slides up inside this hole.
 You must gently and carefully remove the electrical connector and the clips (blue arrows) to extricate the pump from the filter.
 Here you can see the outer casing (yellow arrow) and a dirty sock filter (blue arrow). The sock filter goes on the bottom of the pump but does not have to be removed. Simply clean it with compressed air.
 Don't forget to retrieve the rubber o ring and put it here (red arrow) before putting it back together. Note the clip (yellow arrow). Also be very careful with this wire (blue arrow). I actually broke it when I was trying to remove it but I was able to crimp a spade terminal to it and jamb it back together.

Red arrow shows more plastic clips that hold everything together. Be careful.
 Here is another view of the clips that hold the fuel pump to the filter. Picture shows fuel pump installed into a new filter.

At left shows the new 2004 kia rio fuel filter properly installed into the pump and pump housing. Ready to be installed.
Bottom view shows hole where the gas enter the contraption. It's ready to be put back in the tank now. When installing just push down a little so you can thread the retaining ring on. Hook the gas lines and the connectors back together. Put the fuse back in and test it before replacing the back seat.
That's it. It's actually a fairly simple job that only takes a few hours to complete. Take your time and you'll be fine. Although this blog was not about home inspection I thought a lot of people would benefit from the above info. If you found it useful leave a comment. Thanks.
